
Basic CSS
Loi Ngoc Nguyen, Duy-Ky Nguyen, PhDWhat is CSS?
- CSS stands for Cascading Style Sheets
- Styles define how to display HTML elements
- Styles are normally stored in Style Sheets
- Styles were added to HTML 4.0 to solve a problem
- External Style Sheets can save you a lot of work
- External Style Sheets are stored in CSS files
- Multiple style definitions will cascade into one
Styles Solve a Common Problem
HTML tags were originally designed to define the content of a document. They were supposed to say "This is a header", "This is a paragraph", "This is a table", by using tags like <h1>, <p>, <table>, and so on. The layout of the document was supposed to be taken care of by the browser, without using any formatting tags.
As the two major browsers - Netscape and Internet Explorer - continued to add new HTML tags and attributes (like the <font> tag and the color attribute) to the original HTML specification, it became more and more difficult to create Web sites where the content of HTML documents was clearly separated from the document's presentation layout.
To solve this problem, the World Wide Web Consortium (W3C) - the non profit, standard setting consortium, responsible for standardizing HTML - created STYLES in addition to HTML 4.0.
All major browsers support Cascading Style Sheets.
Style Sheets Can Save a Lot of Work
Styles sheets define HOW HTML elements are to be displayed, just like the font tag and the color attribute in HTML 3.2. Styles are normally saved in external .css files. External style sheets enable you to change the appearance and layout of all the pages in your Web, just by editing one single CSS document!
CSS is a breakthrough in Web design because it allows developers to control the style and layout of multiple Web pages all at once. As a Web developer you can define a style for each HTML element and apply it to as many Web pages as you want. To make a global change, simply change the style, and all elements in the Web are updated automatically.
Multiple Styles Will Cascade Into One
Style sheets allow style information to be specified in many ways. Styles can be specified inside a single HTML element, inside the <head> element of an HTML page, or in an external CSS file. Even multiple external style sheets can be referenced inside a single HTML document.
Cascading Order
What style will be used when there is more than one style specified for
an HTML element?
Generally speaking we can say that all the styles will "cascade" into
a new "virtual" style sheet by the following rules, where number four
has the highest priority:
- Browser default
- External style sheet
- Internal style sheet (inside the <head> tag)
- Inline style (inside an HTML element) : highest priority
So, an inline style (inside an HTML element) has the highest priority, which means that it will override a style declared inside the <head> tag, in an external style sheet, or in a browser (a default value).
CSS Syntax
Syntax
The CSS syntax is made up of three parts: a selector, a property and a value:
selector {property: value} |
The selector is normally the HTML element/tag you wish to define, the property is the attribute you wish to change, and each property can take a value. The property and value are separated by a colon, and surrounded by curly braces:
body {color: black}
|
Note: If the value is multiple words, put quotes around the value:
p {font-family: "sans serif"}
|
Note: If you wish to specify more than one property, you must separate each property with a semicolon. The example below shows how to define a center aligned paragraph, with a red text color:
p {text-align:center;color:red}
|
To make the style definitions more readable, you can describe one property on each line, like this:
p |
Grouping
You can group selectors. Separate each selector with a comma. In the example below we have grouped all the header elements. All header elements will be displayed in green text color:
h1,h2,h3,h4,h5,h6 |
The class Selector
With the class selector you can define different styles for the same type of HTML element.
Say that you would like to have two types of paragraphs in your document: one right-aligned paragraph, and one center-aligned paragraph. Here is how you can do it with styles:
p.right {text-align: right} |
You have to use the class attribute in your HTML document:
<p class="right"> <p class="center"> |
Note: To apply more than one class per given element, the syntax is:
<p class="center bold"> |
The paragraph above will be styled by the class "center" AND the class "bold".
You can also omit the tag name in the selector to define a style that will be used by all HTML elements that have a certain class. In the example below, all HTML elements with class="center" will be center-aligned:
.center {text-align: center}
|
In the code below both the h1 element and the p element have class="center". This means that both elements will follow the rules in the ".center" selector:
<h1 class="center"> <p class="center"> |
 Do NOT start a class name with a number! It will not work in Mozilla/Firefox.
Add Styles to Elements with Particular Attributes
You can also apply styles to HTML elements with particular attributes.
The style rule below will match all input elements that have a type attribute with a value of "text":
input[type="text"] {background-color: blue}
|
The id Selector
You can also define styles for HTML elements with the id selector. The id selector is defined as a #.
The style rule below will match the element that has an id attribute with a value of "green":
#green {color: green}
|
The style rule below will match the p element that has an id with a value of "para1":
p#para1 |
Do NOT start an ID name with a number! It will not work in Mozilla/Firefox.CSS Comments
Comments are used to explain your code, and may help you when you edit the source code at a later date. A comment will be ignored by browsers. A CSS comment begins with "/*", and ends with "*/", like this:
/* This is a comment */ |
How to Insert a Style Sheet
When a browser reads a style sheet, it will format the document according to it. There are three ways of inserting a style sheet:
External Style Sheet
An external style sheet is ideal when the style is applied to many pages. With an external style sheet, you can change the look of an entire Web site by changing one file. Each page must link to the style sheet using the <link> tag. The <link> tag goes inside the head section:
<head> |
The browser will read the style definitions from the file mystyle.css, and format the document according to it.
An external style sheet can be written in any text editor. The file should not contain any html tags. Your style sheet should be saved with a .css extension. An example of a style sheet file is shown below:
hr {color: sienna}
|
|
|
Internal Style Sheet
An internal style sheet should be used when a single document has a unique style. You define internal styles in the head section by using the <style> tag, like this:
<head> |
The browser will now read the style definitions, and format the document according to it.
Note: A browser normally ignores unknown tags. This means that an old browser that does not support styles, will ignore the <style> tag, but the content of the <style> tag will be displayed on the page. It is possible to prevent an old browser from displaying the content by hiding it in the HTML comment element:
<head> |
Inline Styles
An inline style loses many of the advantages of style sheets by mixing content with presentation. Use this method sparingly, such as when a style is to be applied to a single occurrence of an element.
To use inline styles you use the style attribute in the relevant tag. The style attribute can contain any CSS property. The example shows how to change the color and the left margin of a paragraph:
<p style="color: sienna; margin-left: 20px"> |
Box Model
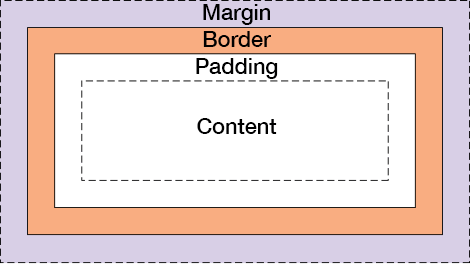
{border:width style color;}
- width: thin, medium, thick, or any unit(ems, px, %, ...)
- style: none, hidden, dotted, dashed, solid, double, groove, ridge, inset and outset
- color:#RGB
Border Order : Top(T) Right(R) Bottom(B) Left(L)
The shortcut order follows clockwise from 12 (T R B L) for all border properties, eg. width, style, color, margin, ...
There's a rule for this shortcut
- Spaces are between values with a single semicolon ";" at the end
- Head values are mandate (T, ...) where zero "0" is used if so required, eg. (0 0 B L)
- Tail values are optional (R, B, L) where the missing values are allowed at the end and take corresponding values ahead, eg. missing L value takes R one, missing B & L values take T & R one
    4 values                 --> {border:T R B L;}

                       |-----------------------|
    3 values {border:T R B;} --> {border:T R B R;}

                     |-----------------------|
                     | |-----------------------|
    2 values {border:T R;}   --> {border:T R T R;}

    1 values {border:T;}     --> {border:T T T T;}

    4 values                 --> {border:0 0 B L;}
Style Settings
- Block Settings : <div> ... </div>
<div style="color:#0000FF"> |
- In-Line Settings : <span> ... </span>
<p>My mother has <span style="color:blue">blue</span> eyes.</p> |
Example 1
Execute upon completion of input
<html> |
and here's the output
Example 2
How to place the image on the page.
<html> |
and here's the output
Example 3
Set an image as the background
<html> |
and here's the output
Example 4
How to repeat a background image.
<html> |
and here's the output
Example 5
How to repeat a background image only vertically.
<html> |
and here's the output
Example 6
How to repeat a background image only horizontally.
<html> |
and here's the output
Example 7
How to display a background image only one time
<html> |
and here's the output.
Example 8
How to place the image on the page.
<html> |
and here's the output.
Example 9
How to position an image on the page using percent. %
<html> |
and here's the output.
Example 10
How to position an image on the page using pixels.
<html> |
and here's the output.
Example 11
How to set a fixed background image. The image will not scroll with the rest of the page.
<html> |
and here's the output.
Example 12
How to use the shorthand property for setting all of the background properties in one declaration.
<html> |
and here's the output.
CSS Positioning
Example 13How to position an element relative to its normal position.
<html> |
and here's the output.
Example 14
How to position an element using an absolute value.
<html> |
and here's the output.
Example 15
How to position an element with relative to the browser window.
<html> |
and here's the output.
Example 16
How to set the top edge of an element using a pixel value.
<html> |
and here's the output.
Example 17
How to set the top edge of an element using a percent value.
<html> |
and here's the output.